Digital Photography and Imaging - Project 1

Week 1 - Week 14
Hong Ze Yee / 0335678
Bachelor of Design in Creative Multimedia
Week 1 : Hearst Mansion

figure 1, Hearst Mansion

figure 2, Shazam

figure 3, Progress
After masking, drag Shazam into the background

figure 4, Progress
Adjust the size,brightness, saturation, fade and shadow to merge the object and background as well as add shadow by using brush tool.

figure 4, My Own edited version
Moved Shazam into Hearst Mansion
File link : https://drive.google.com/open?id=15McahPQKhNHLwpq2xL10cWZokoP96ieK
File link : https://drive.google.com/open?id=15McahPQKhNHLwpq2xL10cWZokoP96ieK
Reflection :
At first, I watched the Youtube video that given by teacher and tried to follow the steps according to the video but I faced a lot of problem such as its hard to follow all the teaching step and come out with a lot of technical difficulties. So, I just try my best to figure it out, to use the other way to complete some details. I think I should take more time to practice Photoshop so that i can use it smoothly to edit my pictures as well as go online to do more research to learn the other tools and shortcuts.
Editing me into Hearst Mansion :
After the lecture class, we have home exercise given by Mr Martin as a practice. All we have to do is almost the same with last week's exercise, is to edit ourselves into Hearst Mansion. I've learned to use brush tool, adjust the capacity, quick selection tool to select the object that you want and to make reflection of an object.
Progress :

figure 1, Progress
Crop myself out and move into the Hearst Mansion bu using quick selection tool.

figure 2, Progress
Start to adjust the colour, saturation, brightness, fade and create shadow to make it believable as well as to do reflection on the floor.

figure 3, My own edited version
File link : https://drive.google.com/open?id=11e8lPiuplmPzOc3XlLSmnqHqaBB-sA3-
Week 2 : Ghost House
Progress :
figure 1, Progress
Crop myself out and move into the Hearst Mansion bu using quick selection tool.
figure 2, Progress
Start to adjust the colour, saturation, brightness, fade and create shadow to make it believable as well as to do reflection on the floor.
figure 3, My own edited version
File link : https://drive.google.com/open?id=11e8lPiuplmPzOc3XlLSmnqHqaBB-sA3-
Ghost house exercise :

figure 1, The house

figure 2, The Dark Cloud

figure 3, Ghost Bride
Process :

figure 4, Progress
Mask the house by using quick selection tool. After that, drag it into the background image.

figure 5, Progress
Adjust the colour, brightness, saturation and fade to make it darker, to merge with the dark sky.

figure 6, Progress
After editing the house, copy the bride ghost into the background(sky) image. Go to the blending mode to choose "screen" effect to hide the black. Then, adjust the size, cut it by using pen tool to make it feels like the bride ghost is in the house. Lastly, create a new layer and use gradient effect.
Final :

figure 7, My own edited version
Lastly, Moved house and bride ghost into dark cloud.
File link : https://drive.google.com/open?id=1b18BcsqTH2jthDOs6NXdIsPg0-030NHG
Week 3 : Re-colouring
Recoloring exercise :
Another exercise is about recolouring (recolour a black & white image to a coloured image). We are going to learn about layers, blending mode and masking.

figure 1, Portrait

figure 2, Progress

figure 3, My own edited version
File link : https://drive.google.com/open?id=1fxPEDfdI71hrjIe6RNDUHc8lHRTR8gI6
Practical session :
Same as usual, we have home exercises given by Mr Martin for us as a practice of re-colouring.

figure 1

figure 2 , my own edited version
File link : https://drive.google.com/open?id=1xIr2t45mbu9KMPPt9Lx_Su541qOTu1lf
Week 5 : Hybrid animal
Weekly exercise : hybrid animal
Our class has replaced to Saturday (16/05) due to public holiday. However, a demo video will be uploaded to guide us for exercise 4 part 2, hybrid animals.
Try to apply leopard skin on frog :
After I've tried the hybrid animals with the demo video, we were require to choose our own images and apply the same practical skills on the picture. I have decided to use frog as my animal and apply leopard skin on it.

figure 1, frog
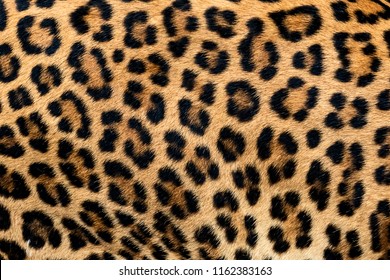
figure 2, leopard skin

figure 3, my own edited version
File link : https://drive.google.com/file/d/1R6TGBR5l3dBcMqKDQWPU9S7-b5OPIEYF/view?usp=sharing
Feedback from Mr Martin :
The overall is nice and good but the little thing I have to improve is the border line of the leopard skin is too harsh and maybe I can soften it to make it looks better.
Tutorial session :
This week tutorial has replaced to Saturday (16/05). Mr Fauzi gives us a brief of project 2 and asked us to do a composition exercise for us to practice before we start our project.
The three composition I have created :

figure 1, first composition
File link : https://drive.google.com/open?id=1qT3A8fYvbnpj7x-q3xcl_un_cPFDxoXG

figure 2, second composition
File link : https://drive.google.com/open?id=12z6VJ2oTQEQs0xcWMA9K7-TrR3-47ZO-

figure 3, third composition
File link : https://drive.google.com/open?id=1veBwHdqJQvS8UG_jZTQh-4yWUSh0zr7g
REFLECTION
When I first came into this degree, digital photography and imaging is very new to me and after joining, it is basically doing / editing photography work. I have never used Adobe Photoshop before so I was anxious at the very beginning but after follow all the information and assistance provided in this class, I have finish all the exercises and weekly practical work. Before step into project, I realize that all the exercises are actually related and very helpful for our projects and I work more easier in my projects since I have finish all the exercises.
I have to be grateful that I can join this class and learn a lot of new things for example, skills of using Photoshop and gained a lot of knowledge of how to create a good and believable Photoshop work. All these things are hepful for me and I hope this can improve my Photoshop skill in future.


Comments
Post a Comment